Adding Logic with Commerce Cloud Controllers
Introduction
Controllers are server-side scripts written in JavaScript and Salesforce B2C Commerce script that handle storefront requests. They manage the flow of data in your application and create ViewModels to process each storefront request as a route and generate an appropriate response.
For example, in a storefront application, clicking a category menu item or entering a search term triggers the controller that renders a page.
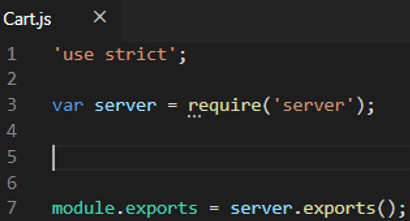
They can be broken down into smaller pieces, so it is easier to analyze each part individually and understand what each part is responsible for. We will be using the Cart.js controller, located at app_storefront_base\cartridge\controllers\Cart.js as a reference for this module.
Dissecting the Controller
Now we will dissect this controller and understand all its parts. You will notice all controllers have a pattern that always repeats and that is what we want you to understand right now. In General, Controllers have the following structure:
- General Imports
- EndPoints
- Route
- Middlewares
- Local Imports
- Retrieve Request Parameters
- Logic
- Rendering
- Middleware Chain
- Exports
Imports
This refers to the first lines of code in the controller where you can see one or many require clauses. These “requires” are located there because they are importing files/classes/functions that will be used by many functions in your controller.
These files can come from several places, be it the Salesforce Commerce Cloud API itself, scripts from the scripts folders, models and so on.
For example, var server = require(“server”); is used on all your functions. As for csrfProtection and consentTracking, in the example below, you will see they are going to be used by some endpoints later on.

Endpoints
Take a look at the endpoints list. Did you noticed that all of them start with server.<something> and the first parameter is a string? This is what we call the endpoints.They represent how you are going to call that endpoint, whenever you need it.
Most common endpoint you will find are get and post at least on app_storefront_base cartridge. But in the future you might use other endpoints like append, prepend, replace or use.
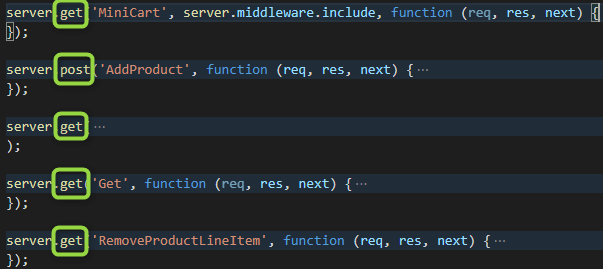
Route
Routes are defined in the 1st parameter of the endpoint and specify the string you are going to use to call the endpoint. That’s it. By default use Pascal Case naming when defining the Route for your endpoint.
Middlewares
This concept is sometimes difficult to understand. If you already have experience with Nodejs you probably know what are they and how to use them so you can skip this section. If not just mention that Middleware functions are a really great way to run code on each request, or on each request for a certain route, and to take action on request or response data. Middleware is a crucial piece of any modern web server, and is incredibly useful.
More information about middlewares can be found in this awesome article.

Local Imports (Optional)
Like you saw at the beginning of the file where we had a few requires, very often you will see requires as the first lines of code in the body of the functions. You might be wondering why doing the requires inside the function instead of putting them all together as global.
It’s just so that you only require modules that are really needed for each context.

Retrieve Request Parameters (Optional)
Very often when you create a function, your intention is that it will do the processing based on values that you want to send to it.
Take for example when you want to add a product to the cart or see the product detail page for a specific product. How will your function know what category or product you want to see if you don’t tell it?
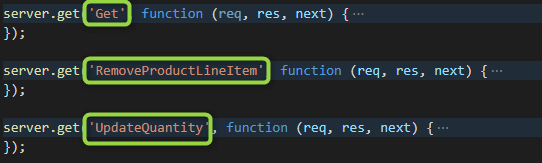
Let’s take as an example when you want to add a product to your cart or update the quantity of a product in your Cart. Again, inside your Cart.js controller, check the UpdateQuantity endpoint, and see the first lines right after the local imports.
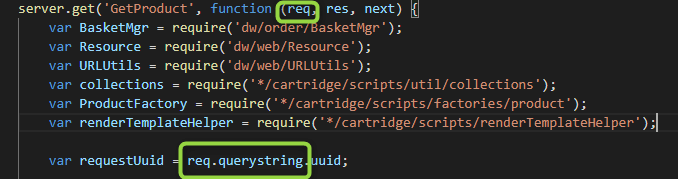
Whenever you call a controller and pass a parameter, the parameter will usually be found in 1 out of 3 objects inside the request object:
- querystring: this is the object that holds your parameters whenever your controller is being called directly from a template
- form: this is the object that holds all the values submitted from a form directly into a controller
- others: Very often you will find that the click of a button is intercepted by an event listener somewhere who grabs your data, creates an object and sends it to your controller via AJAX. In these cases, your parameters will be inside req.<name_of_the_object>, not req.querystring
Logic
There is not much to say here. This is the part of the function where you will write all your logic, communication with the API, transactions, conditionals and so on.
Render a template / Return data
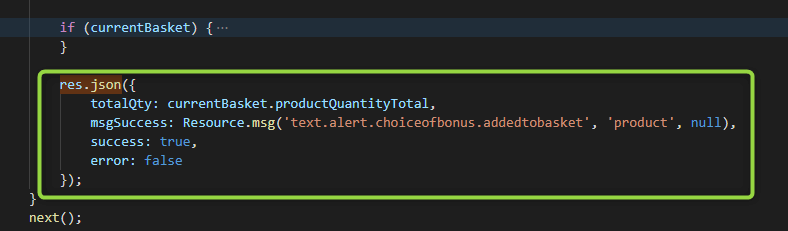
The response from your function will be doing 1 out of 3 things. Or you will render a page (very often sending data to it) or you will return a json or xml with data that will be used on the page.

Middleware chain
This is the simplest but one of the most important parts of your function. This is represented by the always present function call next(). Again, check this reference if you are unsure why to use it.
In short: when calling the function next(); we’re calling next function in the middleware chain to be executed.
The only thing you might be confused about is that sometimes you will see next() and sometimes you will see return next(). This link may help you to understand the difference, but in short, return next(); stops middleware chain propagation.
Exports
This line of code is always the last one in your controller and it makes all your endpoints visible to the external world so that they can be called: module.exports = server.exports();
What are req, res and next?
Before we move one, just a brief explanation of these 3 parameters that are ALWAYS passed to our functions in our controllers. Each step of the middleware chain is a function that takes 3 arguments: req, res and next, in this specific order.
- req stands for request, and it contains information about the server request that initiated the call. It contains user input information and it also parses query string parameters and assigns them to the req.querystring object.
- res stands for response, and it contains functionality for outputting data back to the client.
- The next: notifies the server that you are done with a middleware step so that it can execute the next step in the chain.
Extending your Controller
Now that you know how to structure your controller, let’s talk a bit about a feature in SFRA that allows us to extend these controllers.
Right after I said extend you might have thought: why do we need a feature for that? Can’t we just change the controllers’ code and that’s it? If that happened, you should check the previous module again where we explain why this can be a bad idea.
Remember the server import we were using to do get and post endpoints? Well, it turns out it has other functions we can call in order to extend existing functions.
I keep saying extend, extend but I forgot to explain what does it actually mean, right? By extending we mean you can modify the behavior of a controller without actually touching the original file.
To do that, you will need to create a new cartridge and inside that cartridge, you will create a new controller.
Creating a new Controller
Let’s suppose you want to extend the Cart.js controller to add some extra logic, it doesn’t matter what.
First, let’s create a new cartridge. Or you can use the one you created in the previous module. Once the cartridge is created, let’s replicate the folder structure we have in the app_storefront_base cartridge and create our controller in the correct folder only with the basic code that all controllers need.
Specify the Controller being Extended
The next step is to specify the controller we want to extend. There are 2 ways to do that, it depends only if your controller file has the same name as the one you want to modify or not.
- Same name: In case you named your controller just like the original file, we can use superModule to tell the framework we are extending a controller which has the same name as ours. server.extend(module.superModule);
- Different name: In case you named your controller differently from the original file, we can have to tell the framework we are extending a controller which has a different name by importing that controller. Remember to use the full path. server.extend(require(‘app_storefront_base/cartridge/controllers/Cart’));
Types of Extension
SFRA server module provides a few ways for us to extend a controller. You can add extra logic:
- Before the beginning of your function, using server.prepend
- At the end of the function, using server.append
- At the end of your function after the whole middleware chain (this is a special case we will discuss later on when we talk about Forms Framework), using this.on(“route:BeforeComplete”)
- Replace your whole function, using server.replace
server.append: Whenever you need to add some extra logic at the end of your function you should use the append method. Your code will be run right after the next() function call
server.prepend: Whenever you need to add some extra logic at the beginning of your function you should use the prepend method. Your code will be run as the 1st line of the code in the function.
server.replace: Whenever you are in a situation where it is not enough to add some extra logic at the beginning or at the end of the function and you need to actually change the behavior of the existing code you will end up using server.replace.
For example, imagine that you want to optimize the function or remove part of the code because the requirements changed. You can’t just add code at the end or at the beginning to fix it, you need to rewrite it. That’s where you will use server.replace
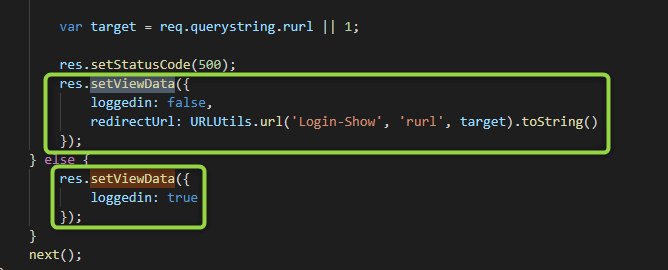
this.on(“route:BeforeComplete”…: This is another way to add extra functionality to the end of your function without using server.append. Open your Cart.js controller and check the end of the GetProduct endpoint. Everything inside this function will be executed at the end of the middleware, in case you might expect your function to be appended.
Any code you put inside this function, you must consider that you are in a different scope, which means you don’t have access to the variables outside this function. To be able to process them, you must use setViewData outside the function and use getViewData inside this function to get them back.
In practice, you will use this function only when you need to add extra logic to your controller without having to create a new controller file, replicate your endpoint with append and so on.
ViewData
One of the most important things to know when extending controllers is to know how to retrieve the contents of the response object.
Let’s just refresh things a bit. Remember when we discussed that your functions will render pages or return JSON objects? And that when we render pages we can send data to the page? We call it ViewData object
Now consider the following: the original function was executed and data was sent to the page, everything ok so far. But now you need to send more data to that page in the endpoint that you are extending. How do you send more data? You must not do a second render.
To fix this problem, the response object provides 2 special methods. They are getViewData and setViewData. Their names are self-explanatory. One allows us to retrieve the current ViewData object and the other to set the extra content to the ViewData object.
Click, Code, Conquer: Your Path to Mastery Starts with These Books!
Showing Controllers in the URL
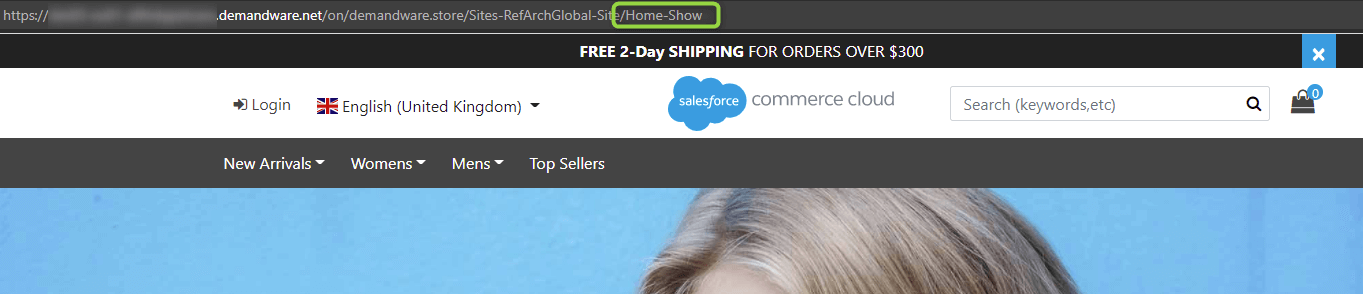
One thing you probably noticed is that your storefront URL does not give you any hint on which controller you are actually calling.
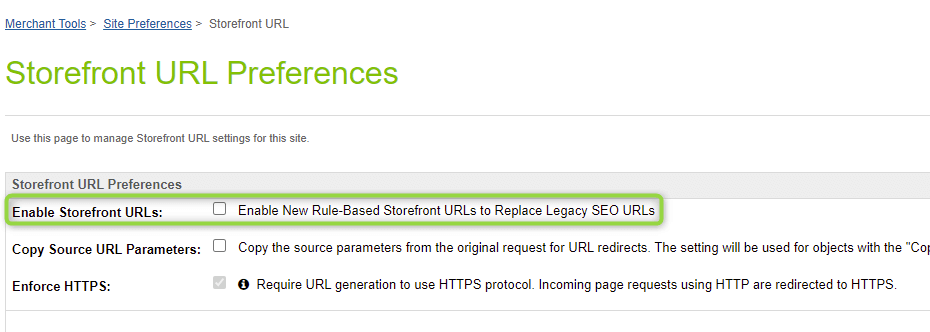
To fix that so that you can call your own controllers through the URL later on follow these steps:
- Go to Merchant Tools > Site Preferences > Storefront URLs
- Uncheck the Enable Storefront URLs checkbox (In production it should be always checked)
- Click Apply
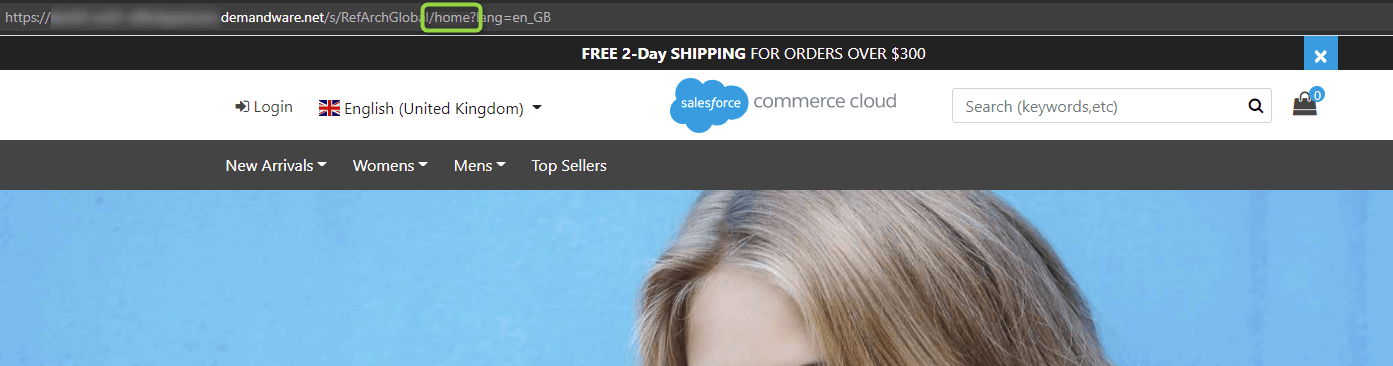
Now check your storefront homepage url again. It should look like this:
Debugging Controllers
One of the most important tools a developer should have is a debugger. It makes your life much easier because you are allowed to pause the execution of your code at any specific line of code so you can analyze the values assigned to variables and also execute your code line by line to make sure that it is doing what you intended.
The Prophet extension on Visual Studio Code not only allows us to sync our code with the sandbox but also provides us with a debugger feature. In order to use it you need to do the following:
- Open any controller and click on the left of any line number that has code. You will see a red dot appears. This is indicative that that line has a breakpoint and if the function is called it will stop the execution at that line if the debugger is running
- On the left panel, click on the bug icon
- If you never created a debug configuration you will see 3 options: Debug with Node.js, Run with Node.js and create a launch.json file. Choose to create the JSON file.
-
It will generate a file named launch.json, inside of a folder named .vscode (Delete it’s content and replace with the following)
{“version”: “0.1.0”,”configurations”: [{“type”: “prophet”,”request”: “launch”,”name”: “Attach to Sandbox”}]}
To start your debugger, click on the play button on the left side of the dropdown list.
Practical Exercises
First of all, make sure you have added your new cartridge to the path of your site. Otherwise, you won’t be able to do these exercises because your controller will never be found.
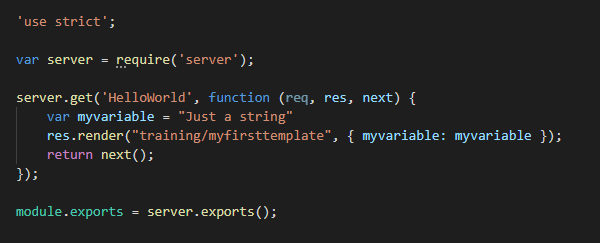
- In your new cartridge create a new Controller file named Training.js
- Create the default structure you saw in the section Specify the Controller being Extended, subsection Same Name
- Create a new GET endpoint with Route "HelloWorld"
- Inside your new cartridge create the following folders structure: cartridge\templates\default\training and create myfirsttemplate.isml
- Add next() as the last line (In the Controller)
- Add a breakpoint to it.
- Start your debugger
- Now go to your storefront and in your URL and after the name of your Site, add /default/Training-HelloWorld
If everything went well, your Visual Studio Code icon on the taskbar started to blink. Also, you will notice that your site is loading forever. Open your Visual Studio Code and you will see that the execution was paused at the line of code we added the breakpoint.
In this exercise, we will create a template to show our data. Don't stress about it, we will have a whole module about them next.
- Open your Training.js controller
- Inside your new cartridge create the following folders structure: cartridge\templates\default\training (if it wasn't created)
- Inside cartridge\templates\default\training create a file and name it myfirsttemplate.isml (If it wasn't created)
- Add the following code to it ${pdict.myvariable}
Open your HelloWorld endpoint and make sure it looks like this:
As you see we are just creating a text variable and sending it to our newly created template. Now call your controller again from the browser. You should see the string “Just a string” printed.
Whenever res.render is called, it starts looking for files directly inside templates/default. That’s why we did not add this to the path of our ISML template in the function call. Furthermore, you don’t need to add .isml to the name of the file when trying to render it.
To make sure you comprehended everything so far, our code will not just add some logic to an existing controller but also add new data to be sent to the page.
- In your new cartridge create a new Controller named Cart.js if it does not exist already.
- Let's extend the Show endpoint and add one string variable to be sent to the rendered page
- Make sure you use res.getViewData() and res.setViewData() to retrieve and add the new variable to the ViewData object.
- Now open the original Cart.js inside app_storefront_base and see what template is being rendered by the Show endpoint
- Replicate the folders structure and make a copy of that template inside your new cartridge.
- Add code to print your variable in the last line right before the </isdecorate> tag
Now on your storefront, on the right left corner click on the cart icon. On the cart page that was just rendered, see if your string is being printed somewhere.
How to be a Certified Salesforce Commerce Cloud Developer for FREE
Unlock a FREE PDF with SFCC B2C Certification questions from our Udemy Course. Join our newsletter!
Check your email, you’ll receive a copy in a few seconds. If you don’t see it, please check your spam folder.
SFRA Course on Udemy
- Getting Started with SFCC
- SFCC Business Manager
- Commerce Cloud Catalog
- VSCode setup, sfra github download
- Cartridge path, upload cartridges
- Adding Logic with Controllers
- ISML templates Demandware
- Data models and view models
- Salesforce Script API
- How to use and organize scripts
- Content assets and content slots
- Salesforce Commerce Cloud Forms
- System and Custom Objects
Salesforce Certifications
- B2C Commerce Architect
- Marketing Cloud
- JavaScript Developer I
- B2C Solution Architect
- B2B Solution Architect
- Application Architect
- Technical Architect
- Salesforce Service Cloud