Exploring the Cartridge folder
Introduction
A cartridge is a directory structure that provides a flexible deployment mechanism for customized functionality. It can contain many different types of files including static files (CSS, JavaScript, etc.), image files, etc. It also contains folders for Commerce Cloud Digital specific files, such as scripts, templates, and form definitions.
Existing Cartridges in the Project
As you might have noticed, our project came with only 3 cartridges. Let’s examine them a bit just so you understand what is important right now and what we can leave for later when needed.
- app_storefront_base: This is the most important folder by far. Here, the whole storefront reference code is defined.
- bm_app_storefront_base: This is an optional Business Manager cartridge to add Page Designer stuff.
- modules: The modules folder is a peer of cartridge folders. Commerce Cloud provides it for globally shared modules, such as third-party modules.
Exploring app_storefront_base cartridge
Never Modify this Cartridge
As mentioned before, the app_storefront_base cartridge is the most important of all cartridges because all the reference SFRA base code and functionality are implemented there. Also, remember to never modify anything inside this cartridge.
You might be wondering why we keep insisting to never touch this cartridge. Imagine that this cartridge is used by all other cartridges as reference. Nw imagine that you have 2 custom cartridges that, for example, make use of a certain file inside app_storefront_base.
If you modify the file inside app_storfront_base, the changes will be reflected to all cartridges that reference it.
Now imagine that one of the custom cartridges is expecting this change. So far so good, right? But now imagine that the 2nd custom cartridge does not expect that change and, in fact, this modification will cause unexpected behavior to the custom cartridge code and something might break and even worse, the client can/will lose money because this behavior is affecting the site.
Understanding Each Folder
Now let’s check each folder inside a cartridge and understand what are they used for and what to put inside of them.
A cartridge is fully contained in one directory. Every cartridge has specific sub-directories where certain file-types must be stored. For instance, you must store all Controller files in a controllers folder.
All folders are placed inside a cartridge folder, as simple as that.
- client: Inside the client folder, you have all code related to client-side, which means frontend Javascript and SCSS. This is the place, along with the templates folder, where Frontend developers will spend most of their time.
- config: Inside the config folder, you have a few configuration files. But usually, you won’t touch this folder’s content
- controllers: Inside the controllers folder, you have all the endpoints with their respective logic that is used by your storefront site. This is the place where Backend developers will spend most of their time
- experience: Inside the experience folder are placed definition files used by the Page Designer tool. We will not cover Page Designer in this course.
- forms: Inside the forms folder, you have all forms’ definition files, which are used for data validation and fields’ definition. Whenever you create a form, all its definition usually is created in a file inside this folder
- models: Inside the models folder, you have all objects definition which are used to pass data within your storefront site pages and retrieve objects data from the sandbox to help populate the models.
Models are heavily used inside Controllers, so it is very useful to Backend developers to understand these objects, in order to better use and customize them according to the project’s needs. - pipelines: Inside the pipelines folder, you have all the LEGACY backend logic that is used by your storefront site. Behind the scenes, Pipelines are a graphical representation (only works on Eclipse IDE with a plugin) of XML files that follow a specific structure and you very rarely will touch them when working with SFRA so, if needed, extra training will be provided for you to understand how they work.
- scripts: Salesforce B2C Commerce provides a proprietary scripting language that you can use to add custom processing for data in pipelines. DWScript is a server-side scripting language, which is interpreted by the server and included in storefront pages as JavaScript.
Inside the scripts folder, you have all the helper scripts, which can be used by controllers, models, other scripts and even templates. - static: Inside the static folder you will have all the static files generated by Webpack’s bundling process such as branding images and they are unlikely to change, so don’t touch them.
- templates: Inside the templates folder, you have all not only the template files but also the resource bundle files (.properties extension), which make it possible for labels and other texts in the storefront site to be displayed in many languages. This is the place, along with the templates folder, where Frontend developers will spend most of their time.
Creating an SFRA Cartridge
When you need to add new functionality to your storefront site the default approach is to create a new cartridge in your project. The base cartridge, app_storefront_base, has all of the code needed for an SFRA storefront to work in Commerce Cloud Digital. It contains:
- The business layer, all of the server-side components (such as Digital scripts).
- The simple presentation layer, including ISML templates, common CSS files, forms, and resource files.
- The specific SCSS, Javascript and advanced UI elements required to create the look and feel of the SFRA storefront.
There are 2 ways of creating a new cartridge: manually or using the sgmf-scripts node package. During this training, we will show you how to create it manually since it is a very simple process.
There are essentially 2 mandatory files:
- .project
- <cartridge_name>.properties
Open your app_storefront_base cartridge and check the file named .project. You will see it looks like below:
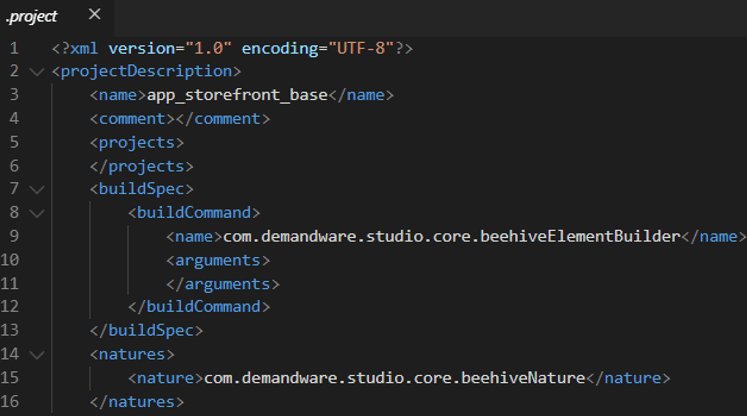
Create a new folder inside the cartridge folder and name it, for example, app_storefront_custom. Make a copy of the .project you opened inside app_storefront_base and paste it inside your new folder
Your new cartridge needs an identical file, only changing the content of the name tag to the name of your new cartridge.
Same process for the .properties file. Check the one in app_storefront_base, copy to the correct location and replace all app_storefront_base occurrences by the name of your cartridge. At the end, it should look like below.
Whenever you create a new cartridge to add new functionality, it is critical that you respect the same folders’ structure that you see in the app_refapp cartridge, otherwise things probably won’t work.
Site Path on Business Manager
When we say path, consider a form field with all cartridges that will be used in the project separated by a colon. Every site has its own path.
Uploading your code to the Sandbox is a mandatory step for your code to work on your storefront but it is not the only one. For a site to use a cartridge, you must add the cartridge to the path of the site in Business Manager.
In order to do that:
- Open Business Manager
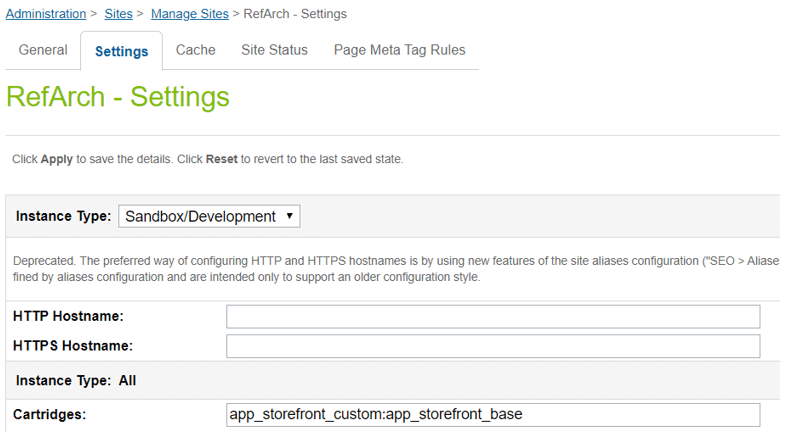
- Go to Administration > Sites > Manage Sites > RefArch > Settings Tab.
- Check the Cartridges field. This is the field that represents the path we were talking about
- Put the new cartridge in the cartridge path, before the app_storefront_base one (remember, if there are duplicated files in different cartridges, the first one to be found, respecting the order in the Cartridges field, will be used)
- Ensure that site caching is disabled for the site.
Adding custom cartridges
There are hundreds of cartridges out there for us to use, so we don’t have to reinvent the wheel and very often your project will need some of them.
SFCC has a list of more than 300 cartridges for you to use. To use it:
- Download the source from github
- Copy the cartridge from inside the cartridges folder
- Place it inside the cartridges folder in project root folder
- Add the cartridge name to your path
When a call is made to a file, your sandbox looks for the file starting with the first cartridge listed in the cartridge path. For example, if a call is made to the productDetails.isml file and that file is located in two cartridges that are both in the cartridge path, the first one it finds will be used.
Using WebDav to see your Cartridges on Business Manager
Administrators/developers use WebDAV to manage files and folders on B2C Commerce servers.
Whenever you are unsure if your file or modifications in your file were uploaded to your sandbox, you can use this tool to verify.
Let’s use it to make sure all your cartridges are indeed in the sandbox.
- Log into Business Manager instance where you want to view cartridge contents (i.e.: staging instance).
- Select Administration > Site Development > Development Setup.
- In the WebDAV Access section, click the Cartridges link.
- An Authentication dialog might displays if this is the first time you do it after opening your browser.
- Enter your Business Manager username/password.
- Click OK.
- Click the code version you created when you imported the RefArch site to see the uploaded cartridges.
- Click the link corresponding to the name of the cartridge you just created.
Create a new cartridge and make it work. Repeat all the steps and create a new cartridge called app_storefront_base_test
Unlock the World of Programming: Click to Open Doors to Success!
How to be a Certified Salesforce Commerce Cloud Developer for FREE
Unlock a FREE PDF with SFCC B2C Certification questions from our Udemy Course. Join our newsletter!
Check your email, you’ll receive a copy in a few seconds. If you don’t see it, please check your spam folder.
SFRA Course on Udemy
- Getting Started with SFCC
- SFCC Business Manager
- Commerce Cloud Catalog
- VSCode setup, sfra github download
- Cartridge path, upload cartridges
- Adding Logic with Controllers
- ISML templates Demandware
- Data models and view models
- Salesforce Script API
- How to use and organize scripts
- Content assets and content slots
- Salesforce Commerce Cloud Forms
- System and Custom Objects
Salesforce Certifications
- B2C Commerce Architect
- Marketing Cloud
- JavaScript Developer I
- B2C Solution Architect
- B2B Solution Architect
- Application Architect
- Technical Architect
- Salesforce Service Cloud